What’s Exciting About a Shrub?

Sometimes the hardest thing about going non-alcoholic (especially at a party) is the lack of interesting things to drink. There are countless books, establishments, even professions dedicated to perfecting the perfect cocktail, but comparatively little effort goes into making a decent mocktail.

DSC_4352_crope

A shrub (new word for me) is a vinegar-spiked, typically non-alcoholic drink intensely flavored with berries, herbs, or spices. I was first introduced to the concept of a “drinking vinegar” at the unparalleled Pok Pok Thai restaurant in Portland, Oregon. There I ordered a raspberry vinegar soda to go with my delicious sticky wings and green papaya salad. The casual lunch was off-the-charts, and I was hooked on the tangy, refreshing combination of vinegar, fruit, and soda water.

I had nearly forgotten about the beverage until Bon Appetit ran a recipe for an Apple Berry Shrub several months ago. I jumped at the opportunity, and simmered together a pint of frozen three berry mix, Bragg’s apple cider vinegar, and sugar. After straining the brilliant red mixture, I poured it over a glass of club soda.

Give it a shot, it just might give you an interesting alternative to boring cocktails.

Recipe: Apple Berry Shrub (Bon Appetit)

Biscotti — A Cookie Shaped for Dipping

When I was little (ok, still) I used to love Chips Ahoy! cookies. The problem lay in our glassware — my family had the tall Collins glasses that didn’t quite fit the circumference of a store-bought chocolate chip cookie. Homemade cookies? Forget it. The solution, of course, was to bite off a piece from the side and then dunk the remaining portion into the cold milk. I always felt cheated though — somehow, that first not-mushy bite felt like it defeat the purpose of a cookie; almost like alternating delicious dunks with boring broccoli.

 DSC_4347

This post of course has nothing to do with milk, Collins glasses, or Chips Ahoy. It is instead a celebration of biscotti, the perfect cookie to eat for breakfast, alongside a nice mug of tea or coffee. It’s a cookie that knows what it’s audience wants — dunkability. The long shape ensures ample area to hold onto while you dunk it multiple times to ensure that sweet spot between crispy wetness and soggy mush.

Biscotti in Italian means “twice cooked”, and it is this double cooking process that gives the cookie logs their satisfying crunch. I prefer mine made pretty traditionally — anise seed and almonds. Not that I don’t like chocolate, but a bicotto should have nothing between the cookie and the liquid it’s dunked into. I also find chocolate to be a little sweet for breakfast, but maybe that’s just me.

There’s a great recipe on Epicurious that I followed here which turned out amazing. Be sure to bake them until they’re nice and golden brown — you want to cook out all of the moisture, otherwise they’ll be hard and not crisp. Use a very sharp serrated knife for the cut, and cut them while they’re warm, otherwise you risk crumbling.

Bring them to work, and they’ll be the hit of the office…or enjoy them all yourself.


Link:
Epicurious: Almond Anise Biscotti


Pork Chops with Beet Ricotta Salad and Rosemary Garlic Turnip Gratin

We “subscribe” to Irv and Shelly’s Fresh Picks, which is a service that delivers fresh local vegetables to your door in the city once a week. As the weather gets colder, “local vegetables” increasingly means “root vegetables”, so last weekend we found ourselves with a vegetable drawer filled with beets, turnips, Japanese sweet potatoes, sunchokes and several other starchy root staples.

1image
I’ve gotten fairly sick of the standard medley of roasted tubers, and wanted to do something a little different. Irv and Shelly included a recipe which suggested preparing the turnips as a gratin, which sounded much more appealing. I generally approach gratins with some hesitation, as they are often ponderous affairs laden with heavy cream, mushy potatoes and overwhelming cheese, but with turnips and a different approach to béchamel, I figured I’d give it a try. On the beet side, beet salads are a personal weakness of mine, so that automatically fit the bill.
2image


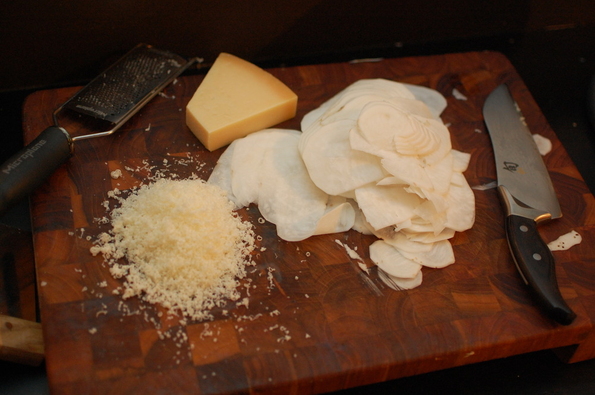
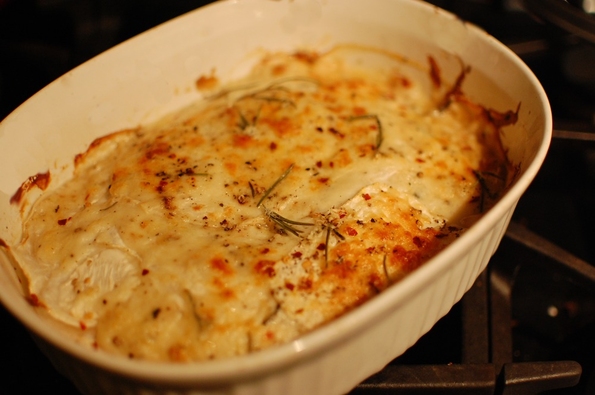
First let’s talk béchamel, the standard flour-thickened white sauce that is the base of everything from mac ‘n’ cheese to pancake lasagna. I’ve often seen it paired with nutmeg, which I find atrocious. Instead, I simmered garlic and rosemary in butter for a few minutes before adding flour to make the roux. I tend to add more flour than strictly suggested by the French — I add until everything is crumbly. After browning the flour, I poured in 2% milk and freshly cracked pepper and simmered until it was thick. What a difference — 2% milk, less butter than normal, garlic and rosemary turned this into a sauce that I could eat from a spoon. Once the white sauce was finished, I layered it on top of the turnip slices (cut with a mandolin, although you could use a sharp knife instead), fresh-grated parmesan, more black pepper, and red pepper flakes. Into the oven it went until brown on top.
Image


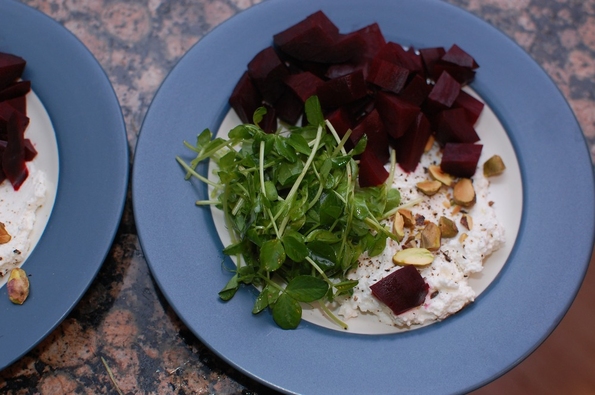
For the beet salad, I started with cubed roasted beets. Alongside those went a dollop of whole milk ricotta, topped with black pepper and pistachio kernels. I had pea tendrils from the Fresh Picks box, so I clipped them and added to the plate for some additional color. The dressing was a simple mix of fresh lemon, good olive oil from my friend Taso, salt, pepper, and a dash of dijon mustard to help emulsify everything. The lemony richness complemented the sweetness of the beets and the creaminess of the ricotta perfectly.


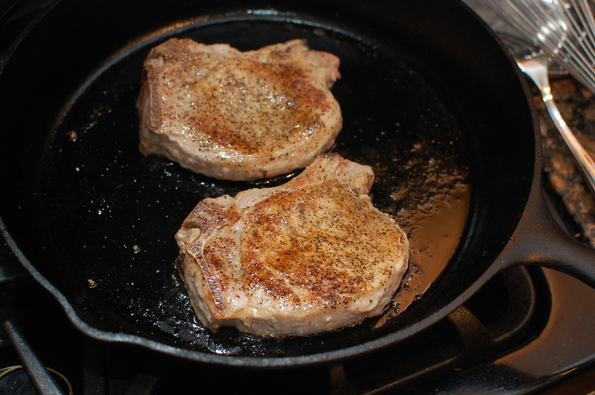
The pork chops, while good, were the least “interesting” part of the meal. I seasoned them with a rub from Spice House made of dried shallots, salt and pepper, and then cooked them on a hot cast iron skillet until golden brown on each side.
3image


While they aren’t pictured, Japanese sweet potatoes completed the meal. They’re interesting too — taste just like sweet potatoes, but have pale yellow flesh. All in all, we did a pretty good job of clearing out the root vegetable drawer, although we still have some more to go. I see some more gratins in my future!
0image


The Chicken to Beat

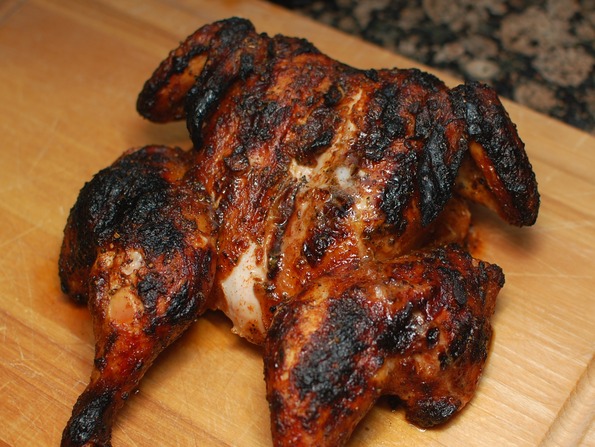
You’d never think to order it, but one of the best things on the menu at The Publican in Chicago is the farm chicken. Starting with a fresh, local, organic chicken, Publican chefs marinade the bird in a sweet, lemony, peppery glaze and grill it until the skin is lightly charred and crispy. What comes out is a remarkably juicy and perfectly seasoned piece of chicken better than just about any you’ve ever had.

Publicanchicken1


Last weekend, I set out to recreate this delicious meal at home. Fortunately, Chef Paul Kahan gave the New York Times a glimpse of his magical recipe. It’s a combination of olive oil, brown sugar, lemon, garlic, spanish paprika and oregano that smells amazing as it comes together. After removing the backbone from the chicken, I set it in a bowl and covered with the thick marinade and allowed it to rest in the refrigerator for several hours. Every hour or so, I’d flip it over and baste a little more to ensure maximum coverage with the delicious mixture.


Grilling was easy — just follow the recipe and use indirect heat, basting every so often. I highly recommend grilling and not roasting — the sugar in the marinade caramelizes on the skin and leaves the outside with a perfect crispy and sweet char.
Dsc_3865
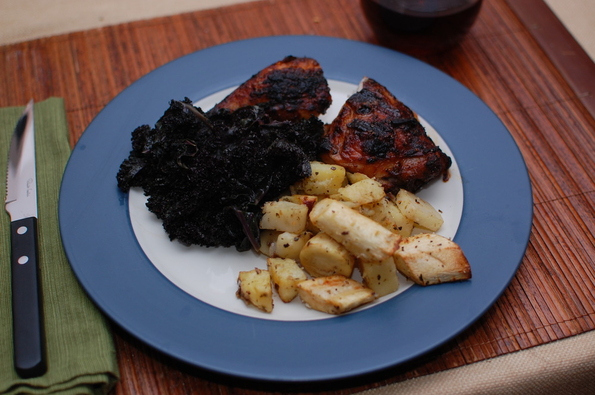
I served it with a roasted potato and parsnip mixture, redolent of olive oil and oregano, and some garlicky sauteed Russian red kale.


Recipe
Publican Chicken via The New York Times


Shhh! Sardines, the Superfood

My introduction to sardines, like many people, came when I was about 5 years old, sitting in front of the TV. Almost without fail, on Saturday morning cartoons, a cat would get tossed into a trashcan, and come out with a sardine tin, top rolled back, stuck to his head. Not exactly appetizing, to say the least.

Image
Fast forward, 2012.


What kinds of foods are people into these days? High protein, low carb, low calorie. Omega-3 fatty acids. Sustainable fish. Deliciousness. Inexpensive never hurts either.


Sardines nail all of this. Protein? 17g per serving. Carbs? Zilch. Calories? 130 per can. Omega-3s? 1300mg per serving. Calcium? 25% daily value. Sodium? Just 8% daily value.


I’ve blogged about fresh sardines before, and decided they weren’t worth the effort. Prepared right, canned ones are just as good. My favorite canned variety is Brunswick, packed in spring water. They’re less than $1.50 per tin, and they can hang out on your shelf for a long time. No refrigeration.


Ok, so now I’ve convinced you that they’re one of the healthiest, sustainable, shelf-friendly, inexpensive and easy foods. Now, the big question — how do you transform them from fishy to fabulous?


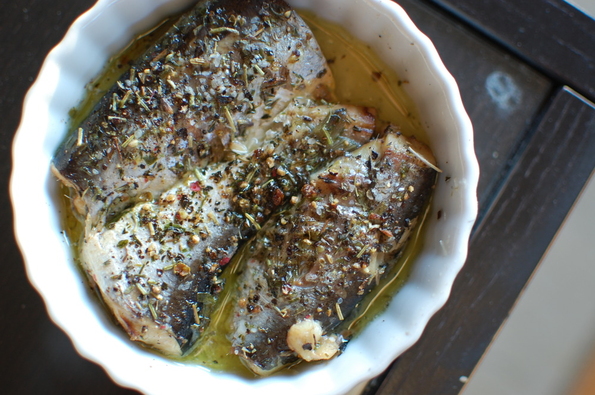
My favorite way to enjoy sardines is broiled, with a sprinkle of herbes de provence (available in your grocery store), freshly cracked black pepper, olive oil, and lemon. If you don’t have herbes de provence (and you should, they are magic on fish), some oregano and thyme will be almost as good. Sprinkle the herbs and pepper on the fish, drizzle with olive oil, and throw under the broiler for 3-5 minutes, until sizzling. Take them out and top with a bit of lemon juice — fresh is great if you have it, but RealLemon tastes good too.


Something about this magical combination completely erases all traces of fishiness and goes perfectly with the flavor of the sardines. Scoop them up with a good cracker (I like Rosemary and OIive Oil Triscuits) and they’ll quickly become your go-to snack. You’ll be eating like a king in under 10 minutes. But keep the secret to yourself — if people realize how good this underrated food is, they might start flying off the shelf!


Recipe — Mediterranean Sardines
1 can sardines (Brunswick packed in spring water, or other)
Sprinkle of Herbes de Provence (or thyme and oregano)
Sprinkle of fresh black pepper
Sprinkle of lemon juice
Drizzle of olive oil
Salt, if desired
Crackers (Triscuits or other)


Drain can of sardines. Place in small oven-safe dish in a single layer. Sprinkle with herbs and black pepper. Drizzle with olive oil.


Broil for 5 minutes or so until sardines are sizzling and small delicious. Remove from broiler and top with lemon juice, to taste.


Eat voraciously with crackers.

Popovers

Cooking is best when there is a story, an event, a gathering. One of the things I love most about food is that it’s the center of so many great things — it combines friends and family, art and nourishment, gadgets and fire. For most of us, many early memories come from watching our mothers, fathers, grandmothers, aunts — whoever — in the kitchen creating a meal or a dish. Foods we eat become associated with those people, and preparing them becomes a great way to look back on fun times.
Dsc_3782


Popovers will forever be associated with my Aunt Candy. I vividly remember staying over at her place with my cousins and whipping up these puffy, crispy, eggy rolls and eating them hot out of the oven with an assortment of delicious, sweet toppings. It was the perfect snack for a sleepover — easy to whip up with ingredients on hand, versatile, and eminently satisfying. It’s not so much that we made them all that often — realistically, it was probably not more than 2 or 3 times — but until then, I had never eaten a popover, and hadn’t really revisited them until I started making my own.


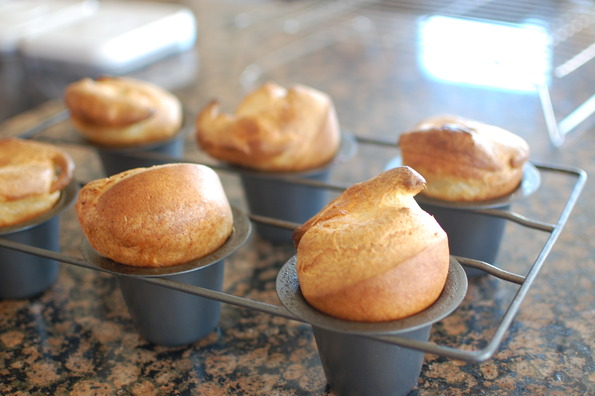
Popover come from a delicious family — Yorkshire pudding, crepes and puffy baked apple pancakes are all made with a very similar batter. The main difference is in the pan — a popover pan is similar to a muffin tin, but with even deeper cups. The deep cups give the popovers more vertical lift. Like the puffy baked pancake, the key to a lofty popover is whipping enough air into the batter, and using it relatively quickly (within 10 minutes or so). The small bubbles that form when you aggressively beat, whip, or blend the batter turn into steam inside the oven. The steam then propels the batter upward, where is is held in place by the proteins in the flour that start to solidify from the heat in the oven. Much like a balloon, the steam inflates the inside while the outside “skin” holds everything together. Pretty cool.
Image
Enjoy it with just about anything — savory popovers with carne asada, bleu cheese and carmelized onions; sweet ones with cherries, cream cheese (or cottage cheese — my favorite — try it!) and a dusting of sugar, or butter, sugar and lemon. They store very well for a day or two in a bag on the counter, or frozen for longer.


Recipe:
I used Alton Brown’s recipe, but I found the salt to be a little much. Try 1 teaspoon, or less if you’re using toppings with a lot of salt.


Carne Asada

Dsc_3413

I was having lunch the other day with a friend of mine, and we were trying to figure out what we should make for an upcoming barbeque. We wanted to move away from the standard burgers and dogs into something a little more interesting. He first suggested bone-in filets, which are always great, but I always feel like I can’t get quite the heat needed for a hearty, steakhouse char on my home grill. That’s not a problem for a lot of cuts of meat, but when it comes to filets, I want all the flavor I can get, and a nice sear alongside the bone is a big part of that.


I threw out flank steak as an alternative, served either as tacos or on top (or alongside) a Greek salad. His eyes looked at my quizzically — “isn’t that one of the inferior cuts of beef?”.


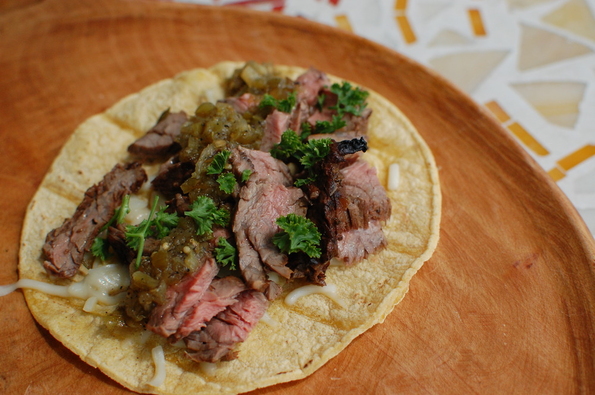
Flank steak, prepared and served like a normal steak, can be a chewy, tough affair. Long, tough fibers and generous marbling make for lots and lots of chewing if the cut isn’t handled the right way. However, those long fibers, and particularly, the beautiful marbling, create one of the most flavorful and delicious cuts of beef if they are marinated, cooked, and, most importantly, cut, the right way. Combined with a nice salad or fresh corn tortillas, flank steak is the perfect summer steak, and one of my favorite ways to cook beef at home. Of course, this is no secret to anyone who has enjoyed a steak taco hot off the grill at a taqueria — carne asada is simply marinated skirt steak (very similar to flank steak) grilled quickly and chopped up.


Yesterday I came home about an hour before I wanted to serve dinner with a 1.5lb piece of skirt steak in hand. The marinade is key, and I hoped that I could get good flavor in such a short time. Working off a mental list of my favorite things in a skirt steak marinade, I combined chopped fresh rosemary, chopped fresh garlic, soy sauce, lime juice, fresh black pepper, olive oil, and salt in a ziplock bag. I mixed it all up, added the steak, and pressed all of the air out of the bag. Since the meat was cold, I left the bag out on the counter for 45 minutes to bring it to optimum grilling temperature (room temperature) as well as more quickly infuse the marinade.


I then turned the grill up as high as it would go, and laid the steak across the grates. After roughly 4 minutes, I flipped the strip of delicious meat, and gave it another 4-5 minutes until the poke test felt like the meat was roughly medium-rare. Of course, you could also use a thermometer or even cut into the meat to determine if it’s cooked to your liking — although try to cut as little as possible, as cutting meat hot off the grill will cause juices to run out.


After a 10 minute rest of the cutting board, I cut the meat into strips against the grain. You can tell which way the grain is by looking closely at the surface of the meat and determining which direction the fibers are running. On skirt steak, the fibers run perpendicular to the length of the meat, so your cuts are going to be in the same direction as the long side of the meat. Once the meat is in strips, cut into smaller pieces for tacos or leave in strips for salad, and enjoy! For me, about 1/4 of the strips end up in my stomach right from the cutting board, but your mileage may vary.

Paella Night

Last night, Sara and I hosted 6 of our friends for a Spanish-themed dinner party. It was the biggest full-on dinner party we’ve had so far, and I had promised paella for the crowd. I’ve made paella several times, but this was the most people I’ve ever cooked a full dinner for, so it was a bit more intimidating than a normal Sunday dinner. We started cooking and preparing at about noon that day, and had everything in place by the time the guests arrived.

Dsc_3263
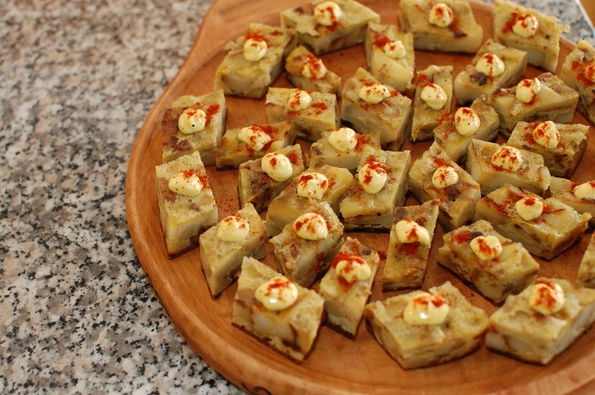
The night started with some appetizers — Sara made her amazing bacon-wrapped, almond-stuffed dates. If you’ve had normal bacon wrapped dates, let me tell you, the almond is a revelation. Dipped in a tangy sauce made with apricot jelly and balsamic vinegar, these little rolls are heaven on a toothpick (Unfortunately, I don’t have a picture of these, or Sara’s equally amazing flan — but if she starts a food blog, these should be the first entries). On my end, I made a tortilla española, or Spanish omelet. One of my go-to tapas, tortilla española is made with pan-roasted potatoes and onions, bound together in omelet form with beaten eggs. I topped it off with a dollop of garlic saffron aioli (piped through the corner of a ziplock bag) and finished with a shake of Spanish paprika. The creamy, saffron-spiked aioli and bright, smoky paprika went perfectly with the savory, salty goodness of the onions and potatoes, so if you make the tortilla, do the aioli too. We rounded out the first course with a delicious selection of Spanish olives, tomatoes and cheeses, courtesy of my friend Caroline. Along the way, we staved off thirst with crisp, bubbly Cava (courtesy of Chris, Mike and Jen-Jen) and cool, fruity, deep purple sangria (thanks JM2K).


Dsc_3252


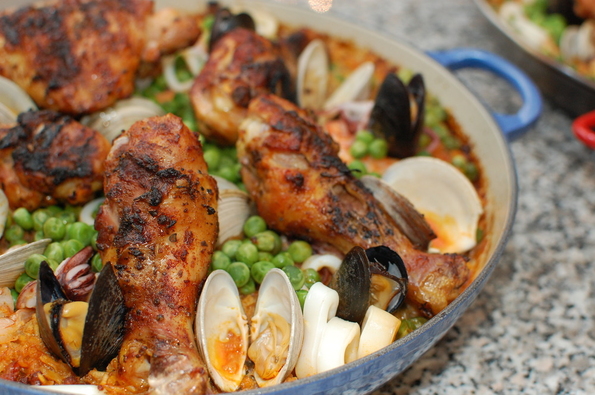
The main attraction was, of course, paella. There are a few things in my mind that make a great paella — the occasional bite of smoky chorizo, the crispy rice (called socarrat) at the bottom of the pan, and the sweet floral aroma of saffron that hits you as you bring the rice to your mouth.


My general procedure is to begin with spicy chorizo, sauteeing it until the sausage pieces turn a dark brown, almost black. Chorizo is a blood sausage, so it’ll get nearly black when they’re done — wait for this stage, and you’ll be rewarded with crisp, crumbly slices. From there, I add my onions and garlic, sauteeing them for about 5 minutes in the chorizo fat. Next comes the rice, enough to cover the bottom of the pan about a quarter inch. The next steps will be familiar to those of you that have made risotto. Toast the rice for a few minutes until it starts to get a bit brown, fragrant, and crackly. Then, add in your liquid a few ladlefuls at a time, allowing the rice to absorb it slowly. For my liquid, I combine chicken stock and clam juice, and add the shells from the shrimp. I simmer these shells for a while (about a half hour if you have the time, longer is fine too) to add a fresh shrimp flavor, and then remove them. About 5 minutes before you’re ready to add the liquid to the rice, crumble a generous pinch of saffron into the broth and allow it to infuse, turning the stock a bright shade of yellow.


Continue to ladle the stock in until most of the liquid is absorbed — I generally shoot for 1.5 cups of liquid for every cup of rice. When you’ve hit your target, start adding your seafood, peas and chicken. I take a more-is-more approach and add mussels, clams, calamari, shrimp, peas, and chicken. This time, I pre-cooked the chicken on the grill (but not all the way) to give it crispy, crackly skin before it went in the pan. Finally, I covered my pans loosely with foil and stuck them into the oven for about a half hour to cook the seafood and let the rest of the liquid absorb. Traditionally, paella is cooked entirely over an open flame, so the oven part was cheating; however, with guests over, I was happy to let the food cook hands free for a half hour or so while I chatted with my friends.


We finished off the night with an outstanding vanilla orange flan that Sara made. Flan is in my top three favorite desserts (with key lime pie and tres leches cake), so this capped off our fiesta perfectly.


—-
Recipes


I kind of just winged it for the dishes I made above, but I read these as a starting point. Use them as a start, but feel free to make modifications along the way


(Notes: used chicken stock, clam juice, shrimp shells as the liquid. No lobster, used shrimp. Used his spice rub for the chicken and it was good)


(Note: I didn’t use anywhere near as much oil as they call for — just add a few tablespoons and sautee the potatoes and onions until brown. Add more oil if you feel like the mixture is sticking. I also never flipped the omelet — I cooked on the stovetop in a cast iron pan, and covered it for the last few minutes until the top set.)


(Note: instead of roasting the garlic, I deep fried it in about 1/4 cup of canola oil. When it cools, you can then use the garlic-infused oil to add more flavor to the aioli. Also, this recipe makes WAY too much — I used one yolk, 1 Tbsp of lemon, a pinch of saffron and the added oil as necessary to create the immulsion. Even with 1 yolk, it was a HUGE amount)

Cool Ingredient: Romanesco Broccoli

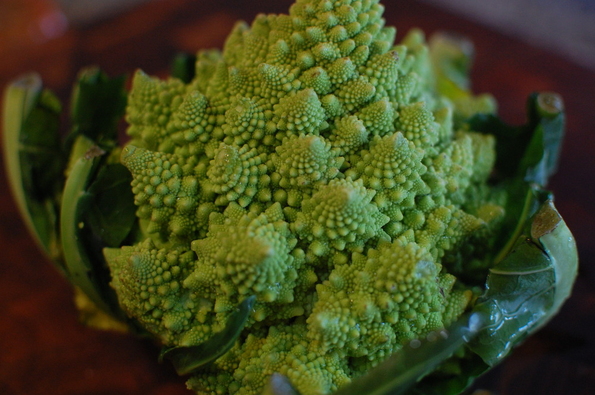
There aren’t a lot of ingredients as visually stunning as Romanesco broccoli. Its shape is a fractal — a self-repeating collection of florets that seem to swirl on, tinier and tinier, forever. I don’t often see it at the store (we get it from time to time in our weekly farm box), but I’m sure if you look hard enough at Whole Foods you’ll see it every once in a while.

Dsc_3166
The texture is much like cauliflower, but the flavor is unquestionably broccoli. We got a bunch last week, and made veggie pizza with it. Give it a shot next time you want to jazz up traditional broccoli with something a little trippier.


We ended up stumbling upon a winner with the broccoli pizza, so I’ve added the recipe below.


Recipe: Broccoli Veggie Pizza
Ingredients:
1 batch of homemade or store-bought pizza dough
1 bunch of Romanesco broccoli (or regular broccoli)
1 container of white button mushrooms, sliced
1 onion, sliced
1 ball of fresh mozzarella (torn or cut in pieces), or 1 bag shredded mozzarella
1 canned whole tomatoes, drained (diced or crushed will work too)
1 tablespoon olive oil
1 clove garlic
Dash or two of red wine vinegar
Coarse salt and pepper
Additional olive oil for brushing crust


Heat oven and pizza stone as hot as you can get it. Mine goes to 550 degrees or so if I set it to broil.


Sauce:
Combine canned tomatoes, garlic, tablespoon olive oil, red wine vinegar and salt and pepper in a food processor. Process until the consistency of sauce. Simmer in saucepan over low heat for about 20 minutes, or until sauce thickens and garlic is fragrant. If you don’t have a food processor, just use crushed tomatoes and dice the garlic up very finely before simmering.


Onions and mushrooms:
Sauté mushrooms in a bit of olive oil until they’ve released most of their liquid. Add a bit more oil and onion slices, sauté everything until caramelized.


Broccoli:
Steam for 6-7 minutes until tender but not mushy.


Pizza:
Toss the pizza crust and place on a peel or baking sheet. Lightly brush crust with olive oil and sprinkle with salt and pepper. Spread cooked sauce on oiled crust. Sprinkle onions and mushrooms and then add pieces of broccoli. Top with mozzarella pieces or shreds.


Cook pizza on stone until crust is golden brown and top is bubbly.

A Need for No-Knead

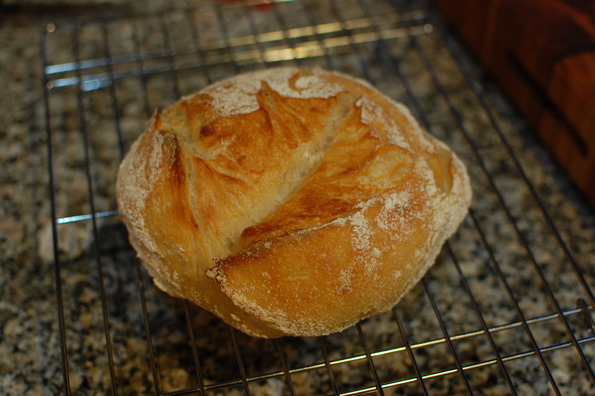
At this point, it’s almost cliche in the world of food blogs to dedicate another page to Jim Lahey’s no-knead bread (a recipe popularized by Mark Bittman of the NY Times). It’s “easily the most popular recipe ever published in the New York Times” according to the New York Times Cookbook, and probably the most popular recipe on the internet. With that said, it is also one of my favorite recipes, and since this is my blog, I’m going to add a few more bytes to the topic.

Dsc_3162


The beauty of no-knead bread for me is not the simplicity — I love cooking really complicated things, so I would have no problem kneading, punching and proofing bread if it yielded great results. Instead, it’s the irresistible flavor that comes from the day-long fermentation and crisp, crackly crust provided by the steam from the wet dough inside the dutch oven. I’ve burned my tongue on many occasions (OK…every occasion) of this bread leaving the oven, too impatient to let it cool.


Eat it right out of the oven (well, give it a few minutes) with just a little bit of butter — ideally unsalted. I’ve had it with olive oil and herb butter too, but unsalted fresh butter is my favorite, since the others cover up the taste of the spongy interior.  If you have any left, it makes a great sandwich, just be sure the slice at an angle so that the crust doesn’t cut the roof of your mouth.


Whip up the dough the night before, and it will be ready to go around dinnertime the next day.


———-


No-Knead Bread Recipe (from NY Times):


Adapted from Jim Lahey, Sullivan Street Bakery
Time: About 1½ hours plus 14 to 20 hours’ rising


3 cups all-purpose or bread flour, more for dusting
¼ teaspoon instant yeast
1¼ teaspoons salt
Cornmeal or wheat bran as needed.


1. In a large bowl combine flour, yeast and salt. Add 1 5/8 cups water, and stir until blended; dough will be shaggy and sticky. Cover bowl with plastic wrap. Let dough rest at least 12 hours, preferably about 18, at warm room temperature, about 70 degrees.


2. Dough is ready when its surface is dotted with bubbles. Lightly flour a work surface and place dough on it; sprinkle it with a little more flour and fold it over on itself once or twice. Cover loosely with plastic wrap and let rest about 15 minutes.


3. Using just enough flour to keep dough from sticking to work surface or to your fingers, gently and quickly shape dough into a ball. Generously coat a cotton towel (not terry cloth) with flour, wheat bran or cornmeal; put dough seam side down on towel and dust with more flour, bran or cornmeal. Cover with another cotton towel and let rise for about 2 hours. When it is ready, dough will be more than double in size and will not readily spring back when poked with a finger.


4. At least a half-hour before dough is ready, heat oven to 450 degrees. Put a 6- to 8-quart heavy covered pot (cast iron, enamel, Pyrex or ceramic) in oven as it heats. When dough is ready, carefully remove pot from oven. Slide your hand under towel and turn dough over into pot, seam side up; it may look like a mess, but that is O.K. Shake pan once or twice if dough is unevenly distributed; it will straighten out as it bakes. Cover with lid and bake 30 minutes, then remove lid and bake another 15 to 30 minutes, until loaf is beautifully browned. Cool on a rack.


Yield: One 1½-pound loaf.