Essential Gear: Bamboo Scrapers for your Cast Iron Pots

If you’re a cast iron fanatic like me (and if you got here through Reddit, I know you are), you know how hard it can be to clean the baked-on bits from the bottom of the pan after searing a steak or sauteeing some vegetables. Kosher salt, oil and some sturdy cotton flour sack dish towels can go a long way, but sometimes you need something a bit stronger, but not so hard that you’ll remove your hard-won, perfect seasoning.

Bamboo_scraper

Pot scrapers are perfect for this, but most of the ones I’ve seen are cheap plastic. I bought a few, and melted them quickly after trying to scrape a hot pan. While I could let the pan cool down, it would harden some of the food and the relatively inflexible plastic still wouldn’t make great contact. Clearly a better product must be out there.

The other day, while walking around Crate and Barrel, I noticed some inexpensive bamboo pot scapers. A marvel of modern design, the scrapers have a different radius on each corner to accommodate a variety of pans. It fits my Lodge 12″ skillet perfectly. The bamboo is hard enough to scrape up the most stubborn, burnt on food, yet pliable enough to make good contact. It doesn’t melt, and is fine in the dishwasher.

Pick up one (or three!) for a few dollars from Crate and Barrel or Amazon. You won’t regret it.

Originally posted October 14th, 2010


Ingredient Spotlight: Rosemary Infused Olive Oil

Rosemary-infused olive oil is super-quick way to add great flavor to pizza dough, bread or potatoes. I used it instead of regular olive oil the last time I made Mark Bittman’s Pizza Dough (which, by the way, is a must-make), and the results were fantastic.

Rosemary_olive_oil

I made the infusion in basically the same way I make garlic olive oil — essentially deep-frying the rosemary in the oil. I heated up a cup or two of extra virgin olive oil in a cast-iron saucepan until it was hot but not yet smoking (be careful not to hit the smoke point of you’ll introduce off flavors). I then added rosemary — mine was dried, but fresh would work too — and let it “cook” for a minute or two before taking it off the heat. After cooling, I funneled the oil and a few branches into an oil jar and let it sit for a few more days before using.

A side benefit of doing it this way is that you get a nice rosemary smell in your kitchen for a few days.

Originally posted October 9th, 2010


At the Market: Sweet Bell Peppers

Now is by far the best time of the season (at least in Illinois) for the farmers’ markets. Among the fresh berries, tomatoes (that’s another post!) and apples are some really amazing sweet peppers. Red, green and yellow bell peppers are actually the same plant (a cultivar ofCapsicum annuum),  chosen at different stages of ripening for different colors and flavors.

Roastedpeppersandwich

Bell peppers go well with a variety of foods, like sausage, tomato sauce and ground beef, but my favorite is pairing them with fresh goat cheese. The earthy sweetness of the pepper (particularly red) complements the tanginess of the goat cheese perfectly, and gives a great depth to pastas, sandwiches and pizzas. Last weekend, I returned from our local farmers’ market with about a half dozen peppers in several colors, and got to work. I roasted them over a charcoal grill until the skins were blackened, and then set them in a bowl covered with shrink wrap for about 5 minutes to loosen the skin. If you don’t have access to a grill, try roasting them in an oven or broiler, turning the peppers every few minutes so the skin is evenly charred.After peeling them, I sliced the flesh into strips, saving most of it for later.

The remaining parts I layered on top of toast spread with a thin layer of goat cheese and a twist of freshly ground pepper. I then piled on some carmelized onions and grilled chicken, popped in between the plates of my panini press, and out came a delicious, summery sandwich.

Pizza

The rest of the peppers were used over the next few days on a pizza and another sandwich. There are a thousand uses for roasted sweet peppers, and they keep in the fridge for about 5 days.

Originally posted August 28th, 2010

Ingredient Spotlight: Ceylon “True” Cinnamon

Cinnamon

If you’ve been cooking and sprinkling regular grocery store-bought cinnamon on your oatmeal since you were a kid, do yourself a favor and find some “True” Ceylon cinnamon. It’s lighter in color than what most Americans are used to (which is actually Cassia, a separate bark) and has a much more subtle, mellow flavor with less “spice”. It adds a subtle, but definitely noticeable and new complexity when sprinkled on breakfasts or added to desserts without overpowering the dish itself.

Originally posted August 12th, 2010

Homemade Chicken Shawarma Platter


Shwarma-300x199

Clockwise from top: tomato cucumber salad, hummus, curried grains, and chicken shawarma

I first started cooking Middle Eastern food a few years ago during a few weeks when I decided to see what it would be like to go completely vegan. I ended up doing a lot of falafel sandwiches with tahini sauce and tomato cucumber salad, since they were about the most delicious non-animal food I could find. The veganism didn’t stick (it wasn’t meant to — just an experiment), but some of the recipes I made during the time got incorporated into the regular rotation. Baba ghanouj (eggplant dip), hummus and falafel were relatively easy (although I’m still perfecting the recipes), but I never could figure out a good way to recreate the crispiness and flavor of shawarma in my small apartment, devoid of any huge vertical rotisseries.
 

I tried once more today, and I think I nailed it — the key to crispy and flavorful crust was using two cast iron skillets, one on top of the other. Similar to some popular chicken-under-a-brick recipes, my method involved getting the bottom (larger) skillet very hot, placing the chicken skin-side down onto the pan, laying a piece of foil over the top, and putting another skillet on top of that to press the meat into the pan. The skin side crisped up very nicely and rendered enough fat into the pan so that when I flipped it skin-side up, the bottom got a nice crust as well. After cooking the whole thigh, I took it out of the pan, cut it off of the bone, and gave the pieces one final sizzle in the fat left in the pan.

Combined with curried grains, a scoop of homemade hummus and an Israeli tomato-cucumber salad, it made a delicious and healthy lunch.

Originally posted July 10th, 2010

Continue reading

Rotini with Tomatoes, Asparagus and Goat Cheese

In Illinois, asparagus is in season, so every farmer’s market is overflowing with fresh, purplish green stalks. I love it grilled in the summer, but was looking to mix it up tonight and use some other ingredients I had on hand. I ended up making rotini with chicken and a grilled asparagus tomato sauce finished with goat cheese. Browned butter and garlic added a nice complexity that was really well balanced out by the tanginess of the tomatoes and goat cheese. It was definitely a keeper.

I wanted to keep the sauce simple, and let the fresh ingredients stand out. I started by sauteeing two cloves of garlic in just under a tablespoon of butter. Once it browned, I added in a can of diced tomatoes (use fresh if they’re in season, but use canned if the only tomatoes you can get at the store are a dull orange color — canned tomatoes are ripened on the vined and then canned, so they paradoxically have a much fresher flavor than greenhouse tomatoes). I let a bit of the liquid cook out for a minute or two, then added some fresh basil and turned the heat off. Fresh basil makes a huge difference — you could use dried, but you won’t get the same flavor.

I then grilled some asparagus on my cast iron grill pan with some salt and pepper, then cut it up and added it to the sauce. The chicken breast got a rub with a basic italian spice blend, and was then put on the grill while the pasta cooked. Once everything was done, I combined and finished with a crumble of goat cheese. Quick, easy, delicious.

Originally posted June 23rd, 2010

Rotini with Tomatoes, Asparagus and Goat Cheese

(makes about 2 servings)

Ingredients

  • 2 servings whole-wheat rotini
  • 1 chicken breast
  • 1 can of diced tomatoes, or 2 fresh, in-season tomatoes
  • 2 cloves garlic, minced
  • 2 tablespoons (eyeball it) fresh basic, cut into ribbons
  • 1 tablespoon butter
  • Asparagus stalks enough to make 1 cup chopped
  • A quarter cup or so of goat cheese
  • Dried italian herbs, season salt, or some other rub for the chicken (optional)
  • Olive oil

Directions

Start by putting the goat cheese in the freezer to firm it up if it is too soft to crumble. While it is chilling, melt the butter in a saucepan and add minced garlic and cook until brown. Drain the tomatoes and add them to to the browned butter and cook just enough to cook off some of the excess liquid.

Lightly coat the asparagus with olive oil, salt and pepper, and grill until tender. Chop into small pieces, and add to the sauce. Begin cooking the pasta according to directions. Rub any spices on the chicken breast and grill. Chop chicken into cubes, and layer pasta, sauce and chicken in bowls. Finish with crumbled goat cheese.

Salmon and Eggs

I saved some salmon we pan-seared last night for breakfast this morning to make salmon and eggs. I love salmon for breakfast (particularly the smoked kind), and it goes very well with eggs. I started by putting a bit of white truffle oil in a non-stick pan and then cracking eggs directly into the hot pan, which I prefer to mixing the eggs beforehand in the traditional scrambled-egg way. After the eggs were mostly cooked, I added some grated swiss cheese and finally, the salmon.

Salmoneggs

Since the salmon was already mostly cooked and I didn’t want to cook it more, I purposely left it until last. Finally, I sprinkled a bit of dill on top and breakfast was ready. Total time: 10 minutes.

Next time, it would be pretty good to add asparagus and serve on brioche. You could also do Hollandaise and have an awesome salmon Benedict.

Originally posted May 1st, 2010

Banana Oatmeal Power Cookies

I’ll admit — this one was kind of a fun experiment for me. My friend Brian was talking about some healthy cookies he made the other day that involved banana, and I figured since I’ve had a banana in the freezer for the past 2 months, I’d give the cookies a shot. I looked a few places for recipes, but they all seemed dubiously “healthy”, and I wanted something lightly sweet that went well as a breakfast or with some tea.

Cookies

So I took a stab at throwing together some ingredients in my own recipe. I started by softening all the butter I had in the fridge, which was about 3 tablespoons, and creaming it with some rock-hard brown sugar from the pantry. I had to use a food processor since the beater didn’t play well with the hardened brown rocks, but then beat it as usual with the butter. To this I added the now-thawed, previously frozen banana (which has a vastly different texture than a never-frozen banana). The water in the banana didn’t mix with the fat in the butter, so I added an egg to act as an emulsifier and continued mixing.

Meanwhile, I toasted up 2 tablespoons of flax seed and then 1/3 cup of oatmeal in a cast-iron skillet and set them aside. I also rehydrated about 1/4 cup of golden raisins with boiling water in a small bowl.

To the egg mixture, I added whole-wheat flour, 2 tablespoons at a time, since I had no idea how much I’d need and wanted to make sure I didn’t over- flour. I was basically just looking for a cookie dough-like consistency. Ultimately I ended up adding 16 tablespoons (1 cup). I then added 1/2 tsp of vanilla, about 3/4 tsp of salt, and 1/2 tsp of baking powder, since they all seemed like good things to put in cookie dough. I mixed in the oatmeal, flax seeds and raisins, and had a respectable looking dough.

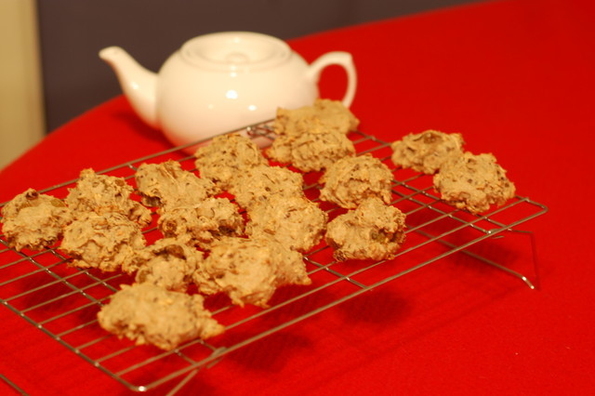
I baked them on a greased cookie sheet for about 15-20 minutes. The cookies themselves came out a bit more like scones than cookies, since the small amount of butter means they don’t spread out as much as cookies do (since there isn’t much butter to liquify). They were just about the right sweetness for me — on par with a scone, and the  oatmeal and flax seeds gave a really good toasted flavor. In fact, overall, I’d say they were pretty much a cross between scones and cookies. However, if you want them more on the cookie side of things, try adding more butter and sugar. The end result was better than I expected, and will make a pretty good snack or breakfast.

Finally, if you do attempt the recipe, don’t be afraid to experiment! I happened to have the ingredients listed, but you could also try nuts, other fruit, chocolate, or whatever. If you’re doing something really crazy, just make a smaller batch, and then start over if they don’t come out.

Banana-Oatmeal-Flax Power Cookies

Ingredients:

  • 3 Tbsp softenened butter
  • 2 Tbsp brown sugar
  • 1 banana (preferably frozen and then thawed)
  • 1 egg
  • 1 cup whole wheat flour
  • 1/2 tsp vanilla
  • 1/2 tsp baking powder
  • 3/4 tsp salt
  • 1/3 cup old-fashioned oatmeal
  • 2 Tbsp golden flax seeds
  • 1/4 cup golden raisins, rehydrated in boiling water

Preheat oven to 350 degrees. Toast oatmeal and flax seeds separately in skillet or oven. Cream together butter and brown sugar, and then add in remaining ingredients in order listed. The dough should end up the consistency of cookie dough — a bit sticky but not overly wet or dry. Form cookies onto greased baking sheet and bake 15-20 minutes, until cookies are brown around the bottom edges. Serve for breakfast, tea, or as a snack.

Originally posted April 23rd, 2010

Essential Gear: Flour Sack Towels

There are some things that you buy and immediately find a thousand uses for. I first picked up a few white cotton flour sacks when I was making Mark Bittman’s [now famous] No-Knead bread. The recipe called for a “lint-free towel”, and my first attempts with a dishcloth left me with a thoroughly unusable piece of fabric covered with sticky dough. Not even a wash could take out the remnants of my foray into breadmaking, since all the fibers grabbed onto the sticky flour and didn’t let go.

Floursacks1

The flour sack worked much better. With a tight weave and no lint (and a healthy coating of cornmeal), my dough didn’t stand a chance. But I soon found myself reaching for the flour sacks for more than just breadmaking — they were remarkably good strainers, dish towels, cast-iron cleaners, vegetable wringers and more. I made Greek yogurt by rigging up a towel rubber-banded over a plastic container and draining off the whey, dried spinach by squeezing the water out, and cleaned my frying pan without leaving bits of lint all over the place. They’re soft and durable, and take many washes (and bleaches if you like) without coming apart.

A lot of kitchen equipment is single, infrequent use, and expensive. At $1 or less apiece, Ibuy them a dozen at a time from Amazon, and always have clean ones at hand.

Originally posted April 12th, 2010

Tabouli (or do you say Tabbouleh?)

Today’s concoction was tabouli. I didn’t set out to make it — while it’s good, it isn’t necessarily a dish that stands on it’s own or something I want to eat all week. However, it happened to fit the bill since I had on hand a bunch of parsley from my ceviche. I picked up some tomatoes and wheat bulgur, and was on my way. Wheat bulgur is ground whole wheat that has been parboiled to make it fast-cooking, and it’s used in many Mediterranean dishes like this one.

Tabouli1

I started with this recipe from Epicurious , since it seemed pretty straight forward and called for stuff I already had. I had to add a bit more than the called-for amount of lemon juice, since my bulgur wasn’t getting soft enough, but other than that, it worked well. The olive oil doesn’t overpower the dish, which is a problem I’ve had in other versions. Overall it came out really well, and I’ll eat it for lunch a few days this week, topped with some feta and maybe some black olives.

Next time, this recipe looks pretty interesting — uses more herbs, including dill and basil, which probably add some other interesting flavor components.

Edit: I had the tabouli today for lunch, on top of some cooked grains (barley and wheat berries) with some feta on top. It made a great salad and I’ll definitely make it again.

Side note: I’m also learning as I go how to take good pictures of food. This picture clearly has way too shallow of a depth-of-field, so next time I’ll go with a narrower aperture to bring more of the dish into focus.

Originally posted April 12th, 2010